GMC
Greater Midwest Classics
GMC
Greater Midwest Classics
By: Randy Johnson
Acknowledgement: Randy has offered to share his experiences and photo's while working on this project.
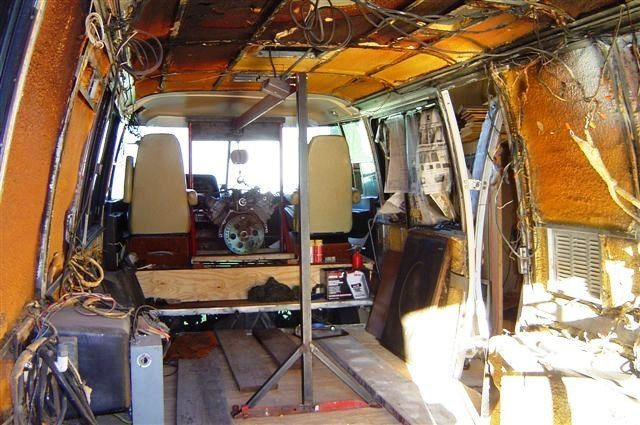
The first job upon getting the GMC was to completely strip it. The rear window/door was removed as was the Onan generator, holding tank, fresh water tank, bathroom module and the remains of the refrigerator and the rear wheel wells, which both were quite broken up from impacts and showed signs, on both sides, of the tires having rubbed almost completely through. Previously, rather than lower the two fuel tanks for repairs, a circular saw had been utilized by a former owner to cut several large holes in the floor to gain access from above. Why didn't I think of that?! I would loved to have seen their expression when they found that they had also cut through the propane line running to the oven and furnace and part way through a structural cross member! One problem that became readily apparent was that the floor sagged down from the frame rails out to the body sides of the coach and heaved up in the middle of the floor, to the extent of about a 2" difference. So, all of the floor was removed, as well as the two fuel tanks. The main tank was fine, but the auxiliary tank was very rusted internally. I was going to run with just one tank, but subsequently found a good used tank and installed that. To prop up the body back to where it should be, I fabricated 10 brackets, five on each side adjacent to each main cross member, and bolted them out-board of the frame. Unable to find one inch plywood, we bonded sheets of 5/8th and 3/8th plywood together and applied a layer of roofing "ice and watershield" material to the exposed underside and sealed the sections to the coach using 3M 5200 marine sealant. Now the floor is level. I also replaced the first step up into the cockpit area. As for the wheel wells, I abandoned my first impulse to make new ones out of plywood and fiberglass and instead used some 1/4" black plastic we had lying around and re-enforced all of the damaged areas along with the use of some metal patches in certain areas that I fabricated and welded up. Now I have a solid, new basis for the rest of the motorhome's renewal.
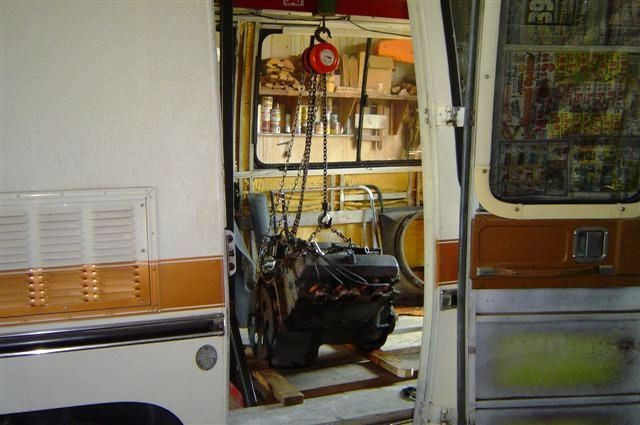
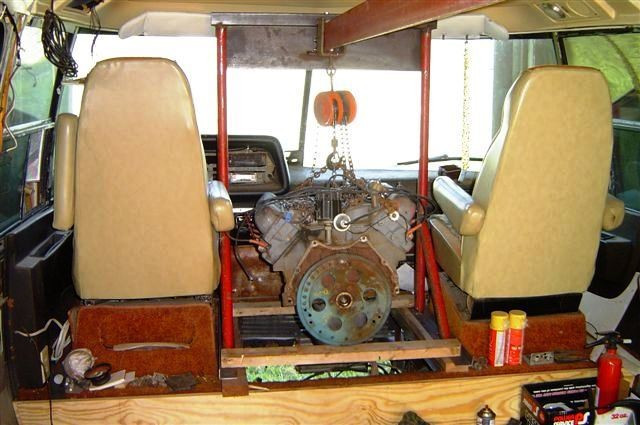
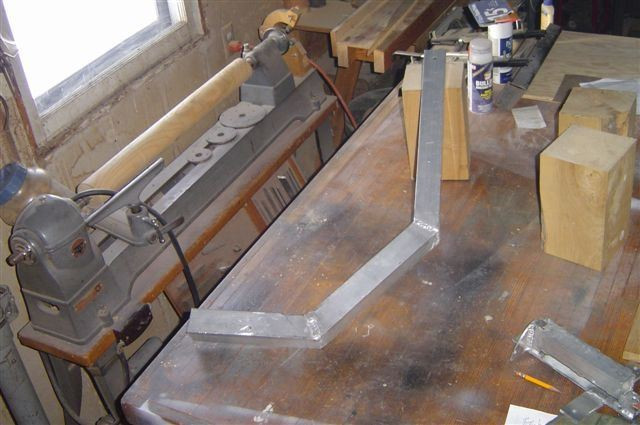
Although the engine ran well on less than 8 cylinders, I want everything on the coach to have been attended to. Removing the engine out of the compartment upwards seemed the best way to go as the coach was gutted. I just didn't want to raise the motorhome up and drop the engine down. Also, we have a small selection of metal on hand, so I was lucky to find two pieces of 3" X 4" angle iron, though about 1' shorter than they should have been. I still got the job done and I was able to build a trolley setup to raise the engine and get it back to the door to remove with my engine hoist. Where I ran into trouble was my home-made assembly to transport the engine back to the entry door area. The weight of the engine would simply not allow the carrier too move. I worked around this problem by lowering the engine to the floor, moving the trolley back a foot or so and raising the engine off of the floor, swinging it back and lowering it to the floor and repeating. This did not take too much extra time and I, by myself, as Dad was in Alaska fishing, removed the engine in less than a day. Installation was just the reverse and was reinstalled in less than a day as well. In between, we went out to Utah to visit friends and relatives, ski, and have a friend help me rebuild the engine with the help of one of his former students who was the head of a Napa machine shop. The engine was built for plenty of torque. I just hope that I never have to use the trolley apparatus again, though would be happy to lend it to somebody else.
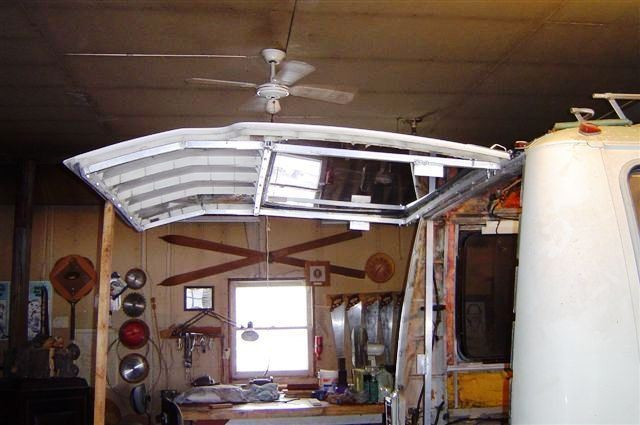
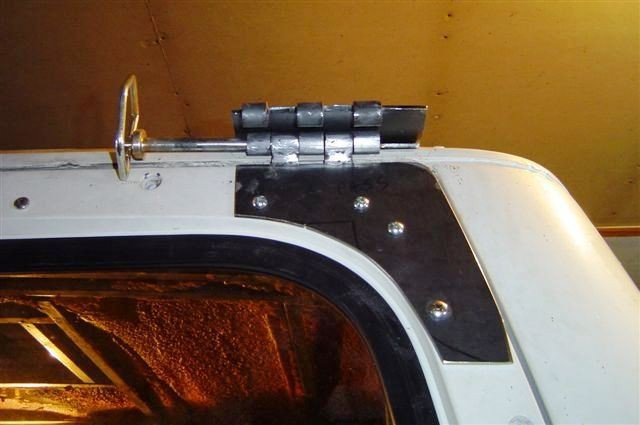
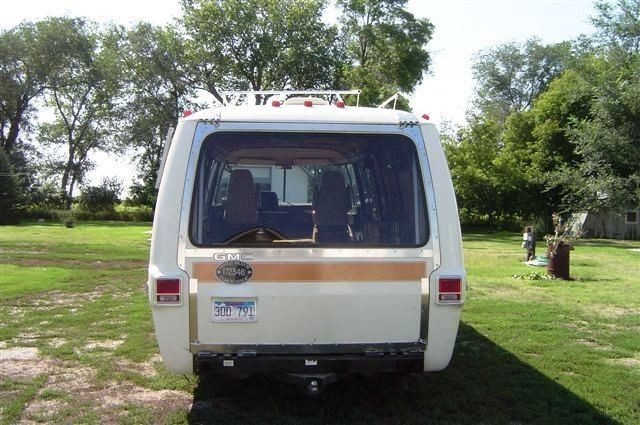
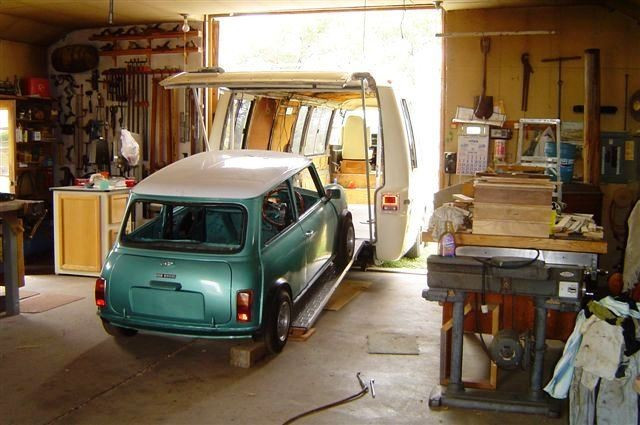
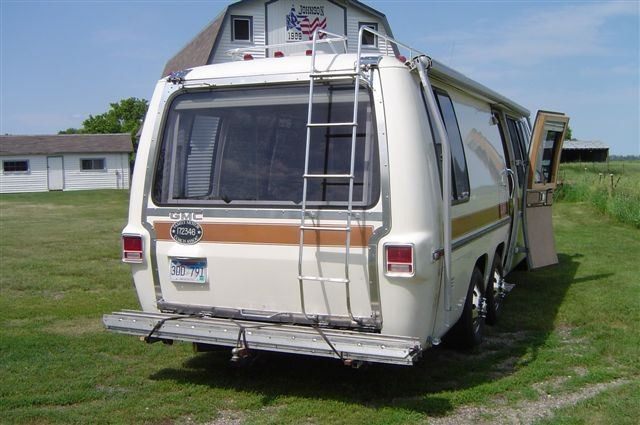
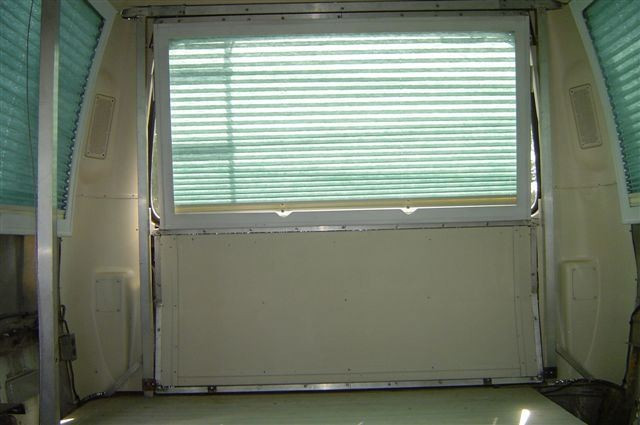
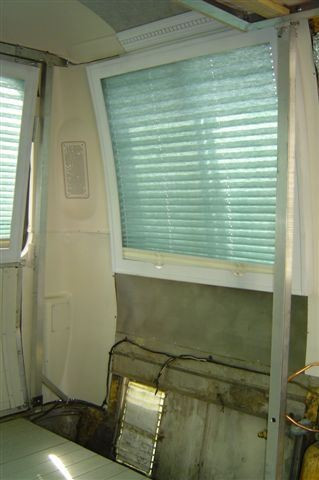
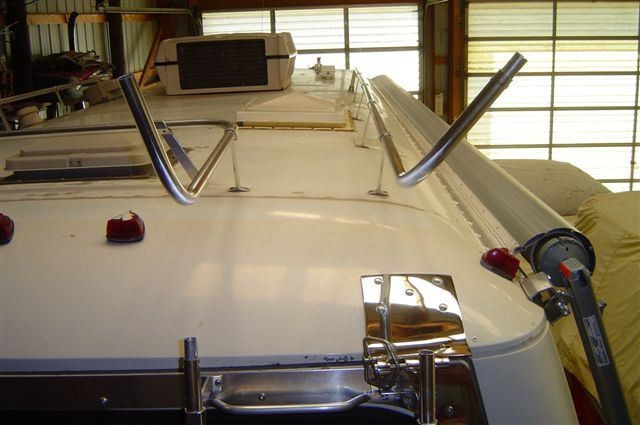
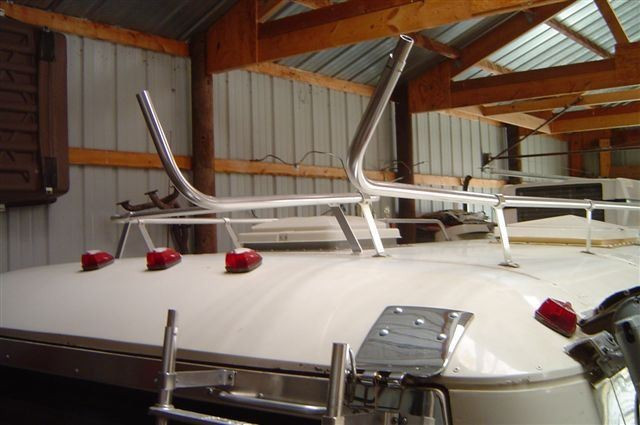
I toyed with many versions in my head for the rear entryway and how to fabricate it. I considered retaining the original fiberglass and window piece or making up a new one out of diamond plate or some such material. I thought about having the door hinge at the bottom which when lowered to a level position would serve as a patio. A screened enclosure could have been utilized in that scenario. I looked at cutting out the rear cross member and fabricating it lower down to enable the car to enter the coach at the floor level, giving the motorhome and car the lowest possible center-of-gravity, but even as small as a Mini is, the resulting entrance width left virtually no margin for error; so resigned myself to building a load bay in the rear of the motorhome and retaining the original back end. I liked this approach as I enjoy the rear view out of the window when driving. The back end only weighs 80# and must be less than 100#s with the reinforcing tubing. I chose 1" square aluminum tubing to give the back end structural rigidity. To give the rear of the motorhome strength when the door is open, I use 1 1/2" square tubing, anchored at the bottom of the two uprights and anchored the two top corners through the roof into the hinges.
As to how to secure the back 'hatchback' to the main body, I went through many different methods of doing this that did not require any tools to open and close the contraption! After rejecting the others, I settled on a double hinge at each corner of the top and a simple T-handle bolt at the bottom corners. I soon realized that the interlocking nature of the back panel with the body necessitated that the rear panel would not pivot in place, but needed to be pulled out first before pivoting. So I conjured up a double hinge where a pin in the forward hinge would hold the rear cap in place normally, and another hinge about 1 1/2" outward would have the pin engaged for pivoting the back 'hatch'. I duly fabricated two hinges and shaped them to the GMC's contours and had them chrome plated. They work quite well. I faced the rear panel along it's edges with aluminum sheet strips to seal up and hide the original securing screw holes. I first purchased hydraulic rams, meant for an International combine, to raise and lower the 'hatch', but abandoned this for fear that they were just too strong. I hope to find powered rams that are long enough, but for now, am using inch square tubing to prop up the door. I'm sure some fine tuning will be needed as I start using this setup.
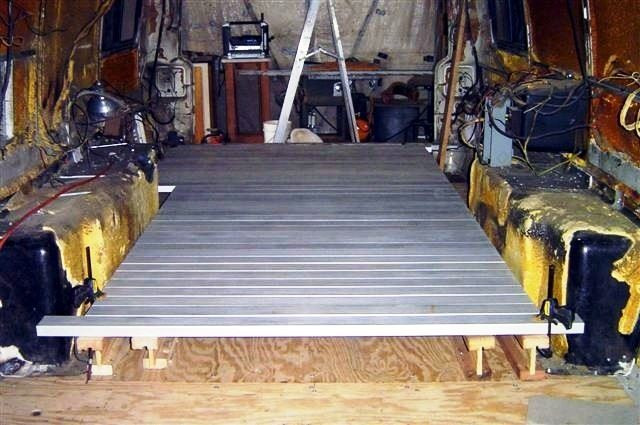
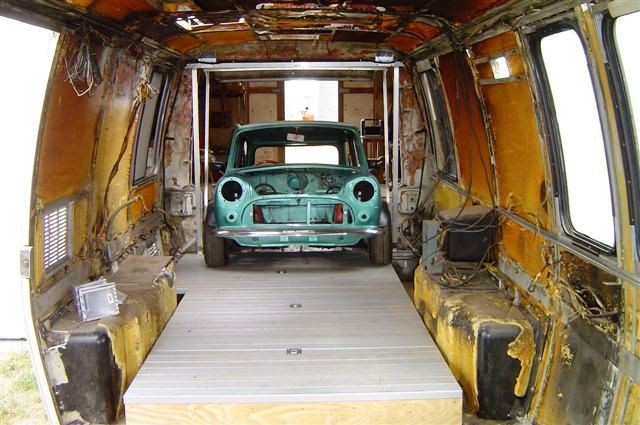
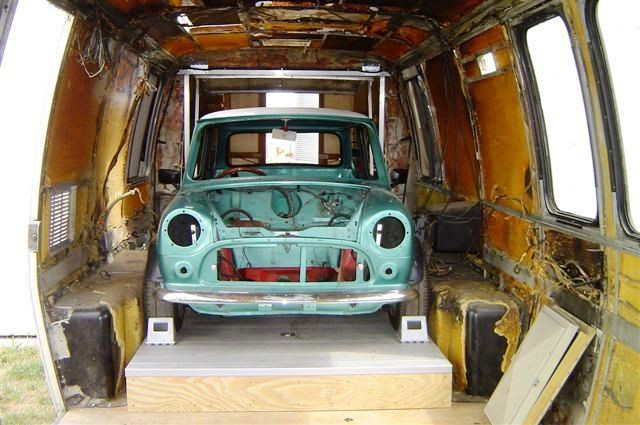
How to construct the storage bay for the mini's? Several plans were looked at, but it was decided to leave the rear horizontal body frame intact, and build up a raised floor, so that the rear entry was flush. Plywood "I" trusses were built to do the support, and the top was covered with aluminum tread plate, with three compartments built in the raised section for storage. The load ramps are an item from an aluminum stock trailer, modified with 2" X 1/4" plate for added strength and a guide for the car wheels.
This is what I am working on now. It took two years to get it shipped from England. Then two years to replace about half of the panels. (I restored the white woody in the midst of that two-year span). Then it sat at the paint shop for 19 months. So I am anxious to finally reassemble it after such a long wait. It is a '67 Mk. 1 Morris Mini Traveller. Dad spent two winters making new wood for both woody’s.
This one was, for two years, a Liverpool, England Police Cooper 'S', but then spent many years as a rally car, a theme that I have continued and improved on. It is a '71 and I will use the '73 body in the background to restore it back to Police specs.
This is my '64 Mk.1 Austin Mini Countryman. It is a bare metal re-spray (only metal not original to the car is the left door skin). It runs and the drive train is out of the blue and white '73 body and has an all-new interior.
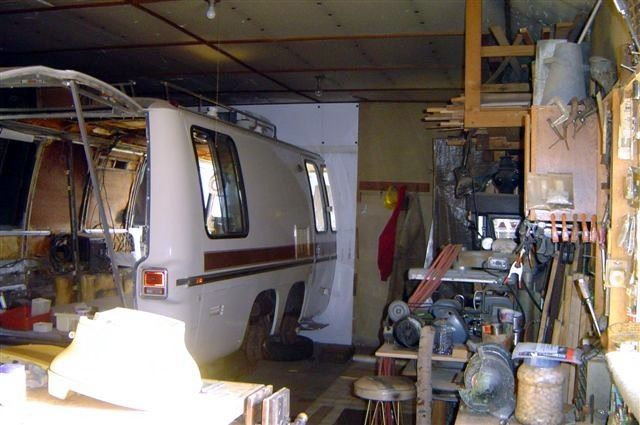
This is how the Mini-hauler is situated this winter and two winters ago. Last winter it was all in the shop, the difference being that two years ago and this year I also have a car in the shop being restored. This just gives us enough room to have the wood working equipment with room for sheets of plywood and the like. Enclosing it took the better part of two days. A straight sided vehicle perhaps would have been an easier job to do this on. We like to sit in the captain's chairs and take high tea and watch the snow, that falls in N. Dakota, blow by on it's long journey to settle in Iowa!
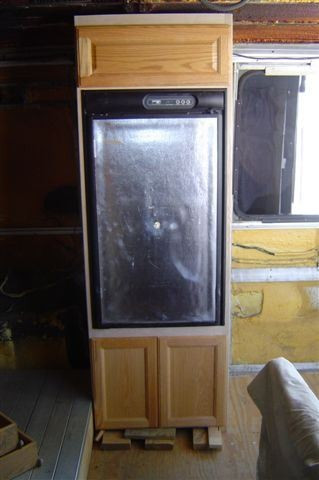
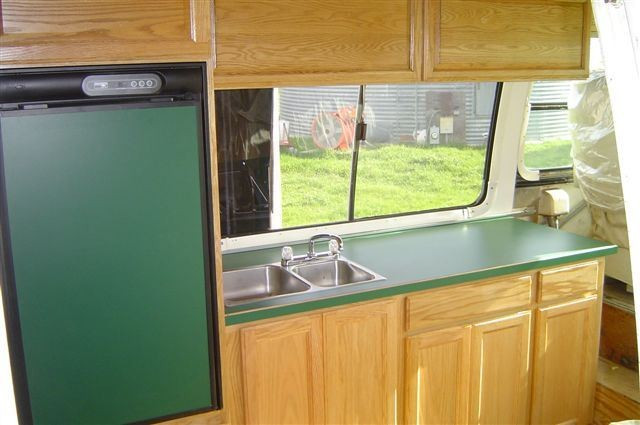
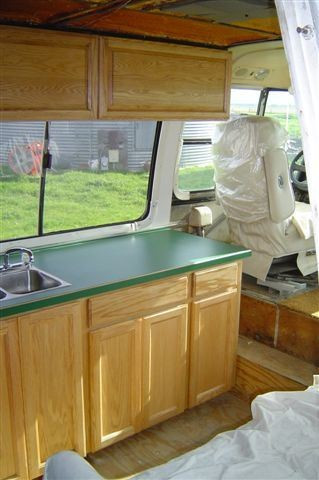
Randy now has started work on finishing the interior of the coach, from the entry door forward. The first order of business was to fabricate a new refrigerator compartment. As the coach was stripped out completely, he decided to install the various units as he desired. He chose to put the refrigerator unit where the kitchen window is. This will require cutting an access panel opening under the window, and installing a vent on the roof.
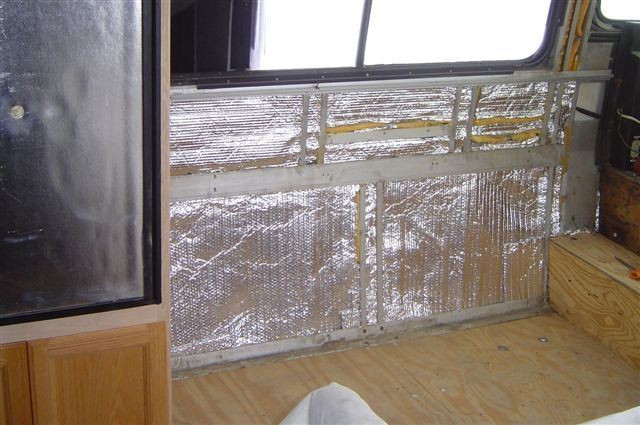
Next, Randy prepared the side wall for where he is going to install the cabinets and countertop. He added extra insulation and covered that and installed a finished sheet which will be the inside of the cabinets.
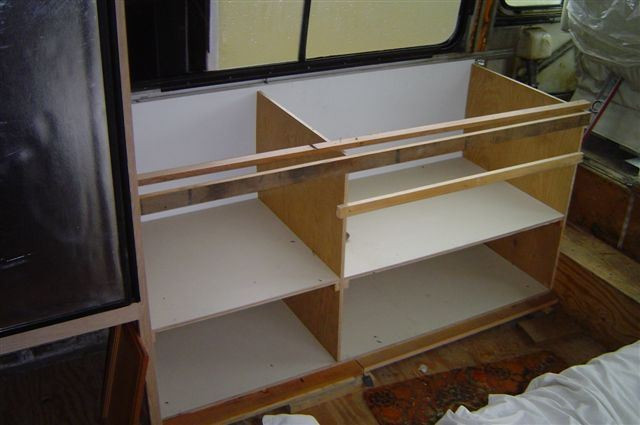
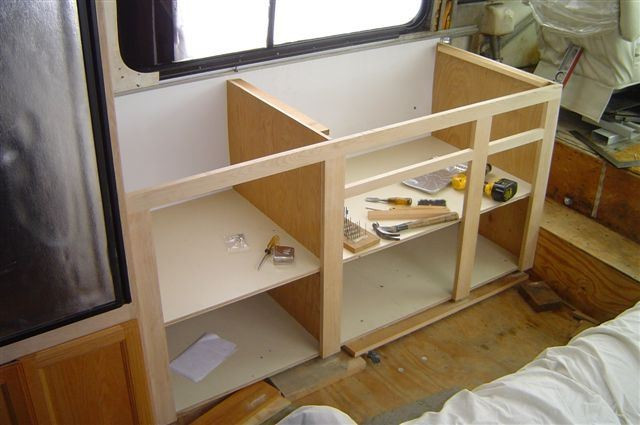
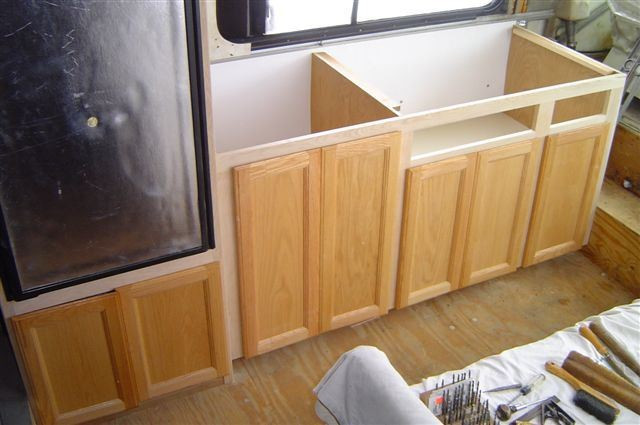
For building the cabinets, he used some parts of the old cabinets that he had in stock, such as doors and drawers, but many had to be cut down and re-glued to fit. The cabinet fronts are from his supply of local green ash.
The formica top is several inches wider than the standard size and Randy did not incorporate a stove top or an oven in the counter top. The use of an electric hot plate and a propane grill outdoors is his choice of cooking utensils.
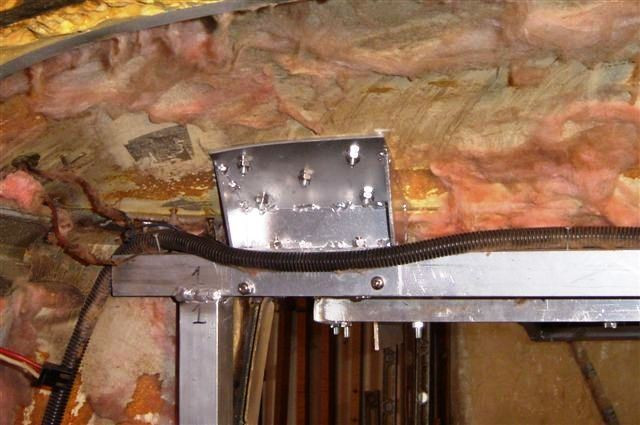
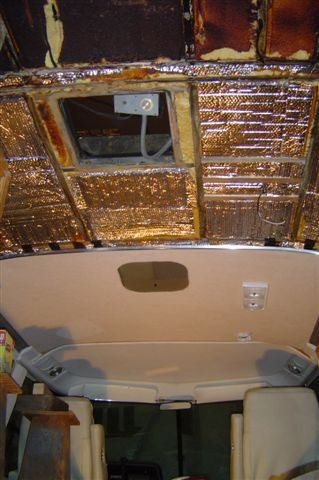
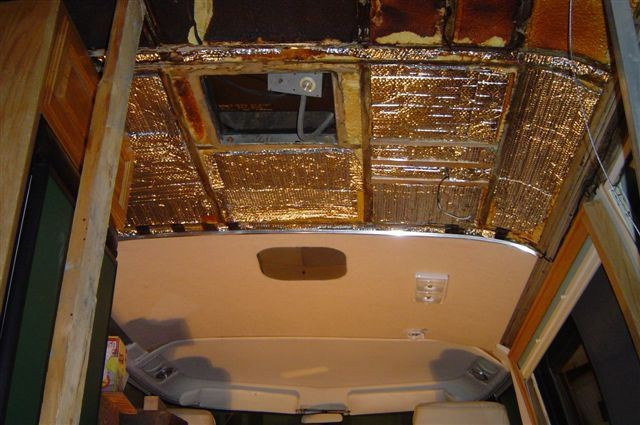
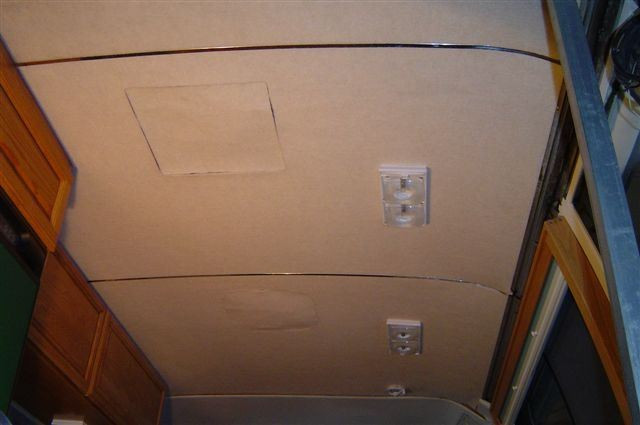
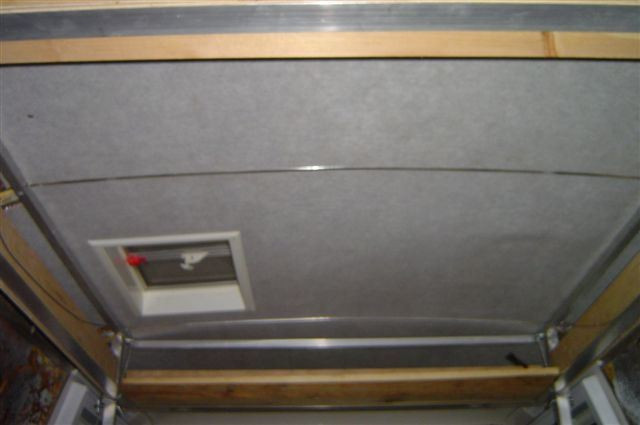
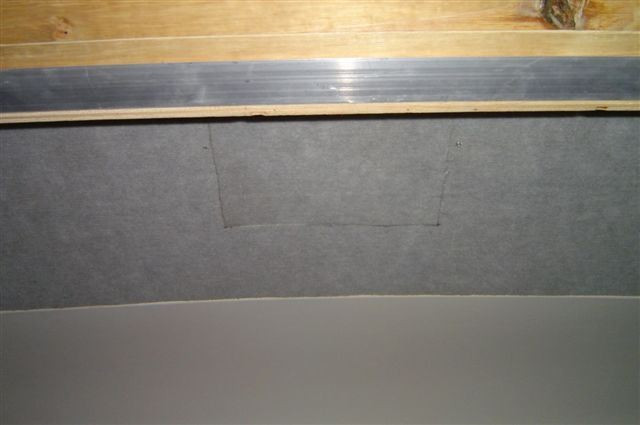
The photos are of what I have done so far with the ceiling of the Mini-hauler. I dropped the front plastic cockpit headliner which only had a few small cracks, which I reinforced and epoxied solid. I used two layers of Reflextec for installation. I had opened the curtain runners and inserted the runners supplied with the Guskes window curtain surround and clamped it all together. I also put a stiffener across the passenger side as there was a sag in that area. The plastic was covered in off white auto foam backed headliner which we have used on other GMCs. The remaining ceiling was covered in insulation. I had purchased just enough headliner at the Amana convention, as used by Winnebago Industries, to cover the forward living area. The grey material is from Menards and covers the garage portion of the coach. These materials were adhered to 1/8" Luan plywood. Each sections is separated by stainless steel cross members supplied by Jim Bounds. Future plans are for two Fantastic fans.
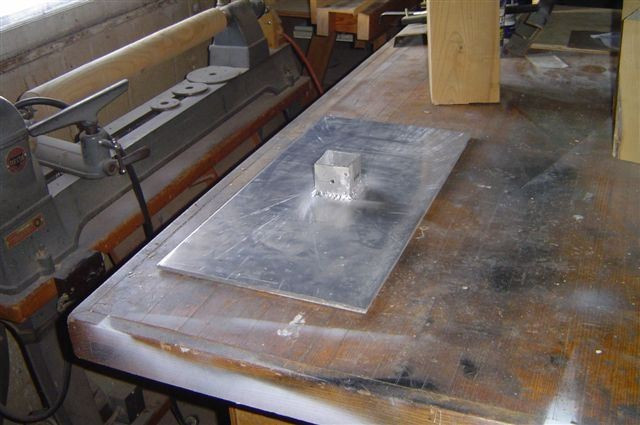
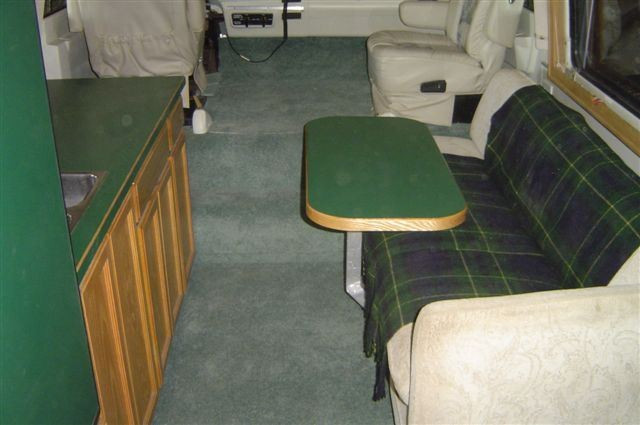
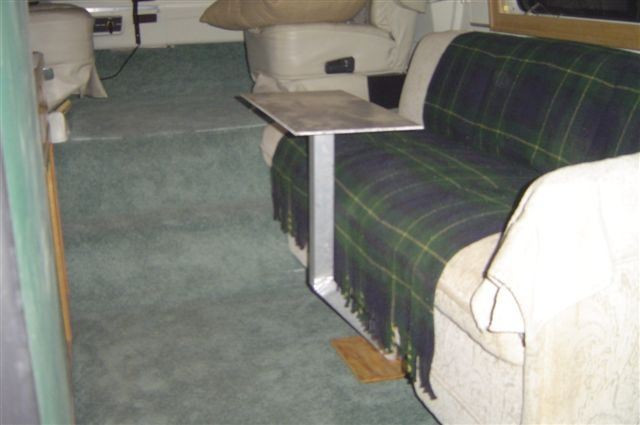
At the Midwest area FMCA rally in Manchester, IA. in the fall of '07, there were many new coaches open for viewing. One of the higher end models had a table that caught my eye as I was looking over my options for the Mini-hauler. I needed one that could be removed as the couch folds down into a bed; but, I wanted a base that didn't interfere with moving about adjacent to the kitchen cabinets. So, I stole their idea and ran with it. The base mounts to the floor under the couch and out of the way. A removable pin secures the 2" square aluminum leg to the floor mount. Another removable pin secures the large plate to the upper end of the leg and Dad has made a very nice table top with formica left over from the countertop and fridge front. The table top is designed to slide out for increased space to sit down on the couch and then pulls back to give others room enough to move about next to the cabinets. The travel available is just under six inches. I'm finding no give to the setup left to right in the motorhome, but a fair amount forwards and aft, so I have another more substantial floor mount in mind before the rig hits the open highways.
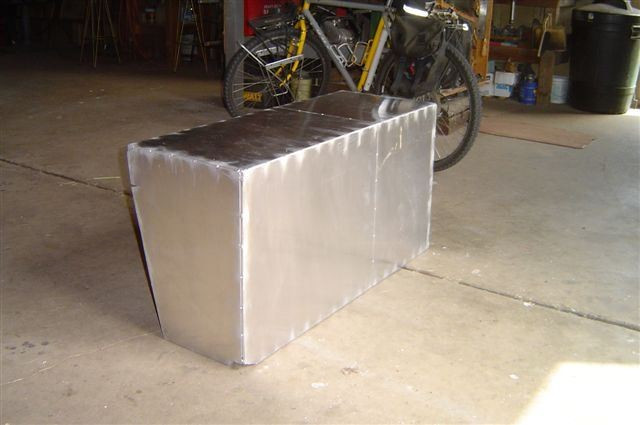
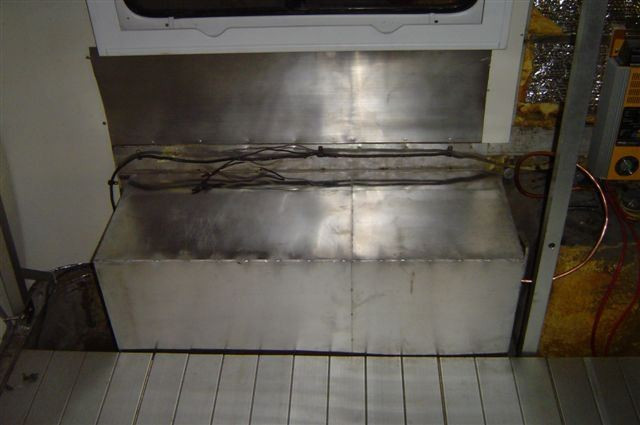
Here are some photo's of the back hatch, the interior showing the finished rear corners and the aluminum box I fabricated for the propane tank. The last two photo's show how I designed the ladder so that it would not interfere with the opening of the rear hatch.
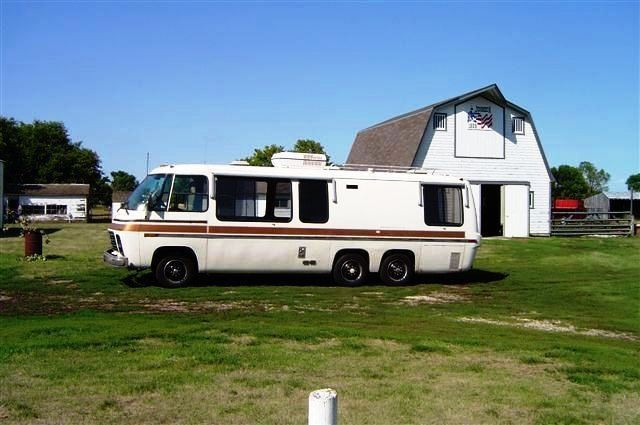
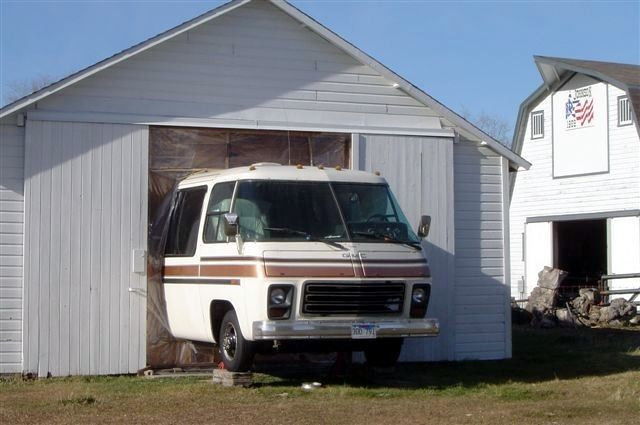
I purchased this '73 coach, which, from the threads of blue carpet strands I believe to be a Glacier, for the princely sum of $1450 in the fall of '04. The motorhome had been repainted in Arizona colors, but, then the converter had overheated and started an interior fire. The interior was subsequently stripped, save for the cockpit seats and bathroom module and part of the refrigerator surround. The rig was in Pocatello, ID. We spent a weekend redoing the seized up rear brakes and trying to get it to run on more than 6 cylinders. In that condition, we went 160 miles to near Salt Lake City, and the motorhome actually ran quite well, keeping up with traffic and making it over Malad Pass at near 40 mph. At Centerville, we removed the engine's right side valve cover and with much effort were able to remove an almost 'Z'-shaped pushrod and replace it. Now we had 7 cylinders of power and set off for the 1000 mile trip back home. The trip was routine, but was an adventure with no working gauges to judge engine condition, and at low speeds through towns and on downgrades, it did look like mosquito abatement was passing by, because we used 13 1/2 quarts of oil in 1160 miles! If we had shipped it like we thought that we might have to, the story would have one less aspect to shake your head over.